Sunday, April 21, 2013

A Fabulous Fine Art Show by Kids, Ages 2 through 6


Our enrichment program recently put on our first official art show at Wonderland Arts.  The artwork was created by students ages 2 through 6 after lessons taught by 4 teachers of Wonderland Arts.  This includes our primary teacher of the 2's class, two primary teachers from the 3 through 6's class, and myself (the Little Wonders art teacher).  We all worked very hard to get this show up and running, and needless to say, it was a great success.  The kids had some amazing and original art that parents and friends appreciated.  Here are just some of the displays that we set up to give you a feel for the show.

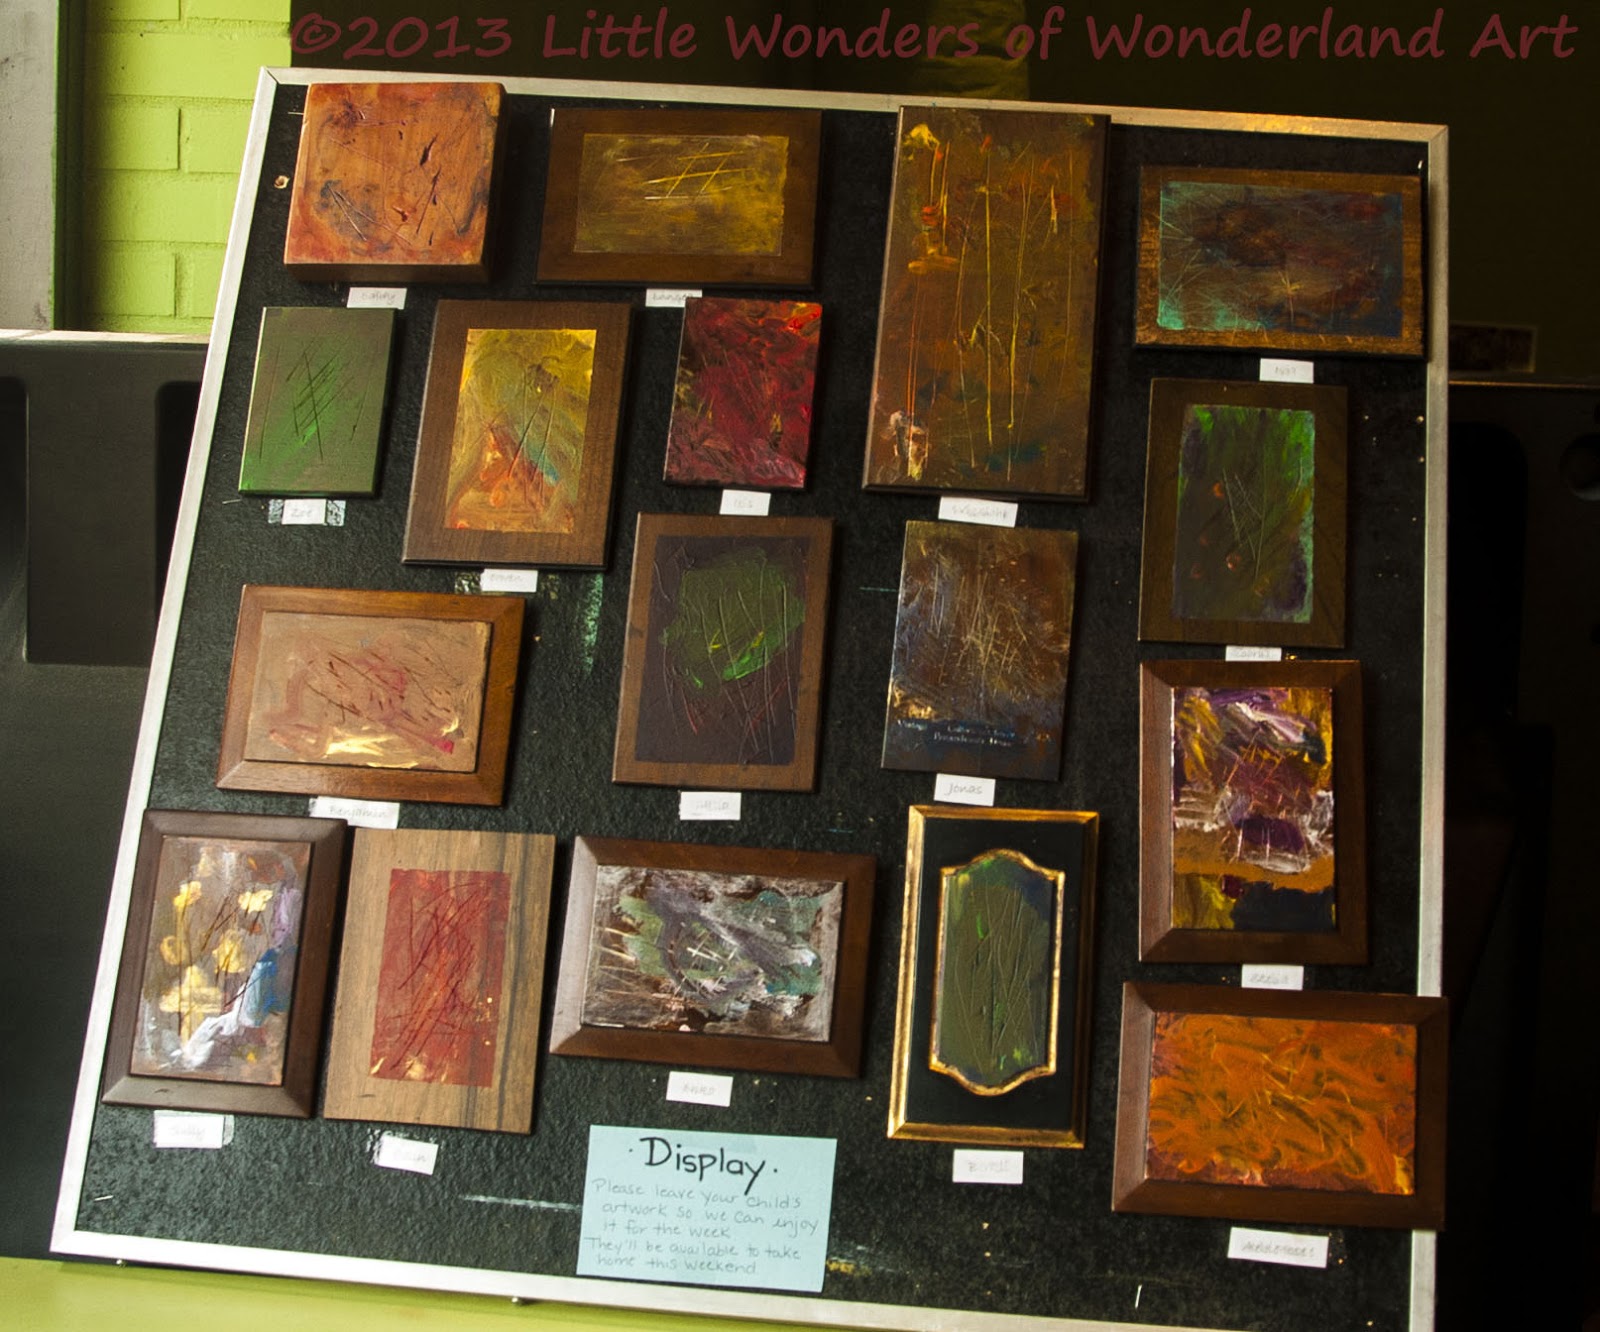
The display above shows some of the finished products after I gave lessons on shading and highlighting. To learn more about this lesson, click here: Shading and Highlighting for Kids

The 3 through 6 primary teachers gave a lesson on melting wax crayons.  This technique is all over Pinterest and there are lots of great tutorials, so just search on Pinterest for melted crayon art f you are interested in tutorials.

To the left, we have some pastel drawings.  To the right, we hung watercolors, and on the stand are some objects on display painted with acrylic.  This grouping was all made by ages 2 through 3 during lessons in my studio.

Created by ages 3 through 6 with our primary teachers, what you see here is some fun and colorful sand art.

Yarn bottles were also done by ages 3 through 6 with the primary teachers.  To learn more about this lesson, I made a tutorial here: Yarn Wrapped Bottles

On the walls above are some more pastels done during my classes, along with painted objects on display, all created by ages 3 through 6.  To learn more about how I teach pastels, click here: Lessons on Pastels   and if you are curious about teaching acrylics to kids, I mention some techniques here: Acrylic Paintings Lesson

Abstract shape art painted with acrylic on cardboard by ages 3 through 6 during my Little Wonders classes.  To learn more about this process, visit my post here: Abstract Shape Art

To the left, images with the black matting were created by 2 year olds with our primary 2's teacher, after she gave some experimental art lessons with paints and glues.  To the right are some more abstract shape paintings by the 2's class.  

These are some of the acrylic painted objects my students ages 2 and 3 worked on.

Wooden wall hangings painted in acrylic, by my students ages 3 through 6.  

More acrylic objects by ages 3 through 6

People in action, mingling and enjoying our gallery set up on the opening day

Our primary teachers who work with ages 3 through 6 worked with the kids to prepare some delicious treats during the art show.  

Thanks for visiting and checking out our art show!  We hope you were inspired!

~Angelique Bowman & the Wonderland Arts Team

Wednesday, March 27, 2013

Abstract Acrylic Paintings on Cardboard: Lesson for Ages 2 through 6

While the my students (ages 2 through 6) have been learning about color pallets with acrylic paint, how to mix acrylic and utilize different brushes and pallet knifes, I have offered a variety of different projects to help them practice these techniques.  This was a fun 2-3 session project that my students worked on they for our annual art show.


If you want to give this a try with your little ones, this is a fun abstract art lesson that will need some prep time by a teacher.

Materials:

  • Cardboard about the thickness of a typical large pizza box (and not so thin like a shoe box).  Actually, I collected the lids of pizza boxes to use for this project.  Cut some of it out into large rectangles or squares for work surface for the kids, along smaller pieces cut into shapes around 1 to 2 inches in diameter.
  • Scissors 
  • Paints.  We used acrylic, but tempera will do.  
  • Paint brushes for painting
  • Paint trays (we use plastic lids from containers like hummus and margarine)
  • Glue like tacky or modge podge for glueing the shapes. I'm sure regular school glue will be fine, too.
  • Q tips or old brushes for using glue
  • Cans for water and for glue.  I used old tuna cans.
  • A couple sheets of paper towels or one rag for each child to wipe access water and paint onto
  • Protective sheets to cover tables and protective smocks or t-shirts for kids to wear using acrylic paint 
  • Markers & Crayons (Optional.  My kids wanted to color on their cardboard as they waited for the glue to dry before painting on them)
I have all of the lessons, preparations, and steps typed out which I will gladly forward to you if you are interested in specifics on how to put this together for ages 2 through 6, but if you are just improvising, have fun with it and just get ideas from the photos below. 

After the shapes are glued on their work surface, the kids are offered acrylic paint to turn their work into a colorful abstract piece.

I show my kids how to clean their brushes and wipe off excess water before dipping into acrylics.

Here are a few of the finished products of the abstract shape art.  These pieces were on display for our annual art show.  To see more works from this show, click here: Photos of Wonderland Art Show

Thanks for visiting!
~Angelique Bowman


Wednesday, March 20, 2013

Lesson on Highlighting, Shading & Blending: Ages 2 through 6

 I had prepared a spot for each child at the table with these drawing tools: An artist graphite pencil, a writing pencil, a store bought blending stick, a handmade blending stick, a piece of white charcoal, grey paper which I taped to the table for stability, a folded up paper towel, and objects for my students to try to draw.  Scroll down for more images and techniques on giving this lesson.

This was an experimental lesson to teach my students a few drawing techniques that many artists use when creating different dimensions, especially in realism.  During my lesson, the kids were shown various graphite drawings and charcoal drawings by a number of artists.  I pointed out different levels of lightness and darkness throughout the work and talked about where the light source was coming from.  I also had some fake fruit handy (from the kids' play kitchen), and put a spotlight on the fruit to point out how it is much brighter on one side than the other.  They took note of where the shadows were made and many were able to point out where the light source was coming from in several pictures that were shown.  Finally, I showed them how to use some of the drawing tools that I offered and demonstrated how to use them on some grey art paper.  I would suggest any colored paper except for white, because the white charcoal will not show up so much on white paper.  If you are interested in trying out these things, I made a list towards the bottom of this post on how the material was presented.

Okay, so you might be thinking to yourself, how should we expect these kids to understand this stuff?  First off, you can't typically expect something "realistic" to come out of this age group.  However, you can expect that the kids will gain knowledge and a better understanding of how things are made.  This is the age where kids are consuming so much information, even if their little fingers aren't quite coordinated physically to create exactly what you are showing them.  Many children will experiment with some of the ideas that you show them, and they will likely do their own thing, too, which leads them to open new doors of creativity that perhaps they didn't know they had.  After most of my fine art lessons, I find that children think more about the dimensions they are drawing/painting/etc., as well as the meaning of the art.  In the moment, they feel that their work is special, regardless of what anyone else thinks it looks like.  And when they think it's special, they are proud of themselves!  That said, on many levels, art is an important subject for children as it can give them a sense of pride in their work and more importantly, in themselves.

When I offered the fake fruits and vegetables for the kids to draw, some of them tried to trace the shape in order to make it "life like."  This was not something I suggested, but I thought it was an interesting way for them to explore drawing from still life.

For you teachers out there, get creative and teach this in whatever manner you choose.  Here are some ways I showed my students how to work with the tools:

An Artist Graphite Pencil & a normal, Everyday Writing Pencil (led or graphite will do): My artist graphite pencil was a 4B and I would suggest this grade or anything darker, as long as it is more contrasting than the writing pencil.  I showed my students a grading scale from light to dark with each pencil to compare the densities.  I wanted them to recognize that there are special pencils out there specifically for drawing that can give them more variety in lightness and darkness.  You may want to point out that you are gently pressing your pencil down for the lighter areas (when making a grading scale) and you are pressing down harder with your pencil as you get darker.

Blending Sticks:  I offered both store-bought blending sticks from an art store, and then I made some larger ones to experiment with to.  To make your own blending sticks, first tear some news paper into a large triangular shape.  I suggest tearing over cutting as it will help create a softer tip once you've rolled it up.  Begin rolling from one of the points, and just try to keep it rolling tight, more so on one end, to create a long and narrow cone.  Tape the end of it, and if your point is a little too narrow or flimsy, it won't hurt to just snip it off and shorten it a little with some scissors.  Show the kids how the blending sticks can smudge or blend in pencil markings to create shades and shadows.

Folded Up Paper Towel:  I folded a paper towel up into a small square and showed the kids how this can also be used to blend pencil marks.  The kids can experiment with the different textures that each blending tool has to offer.

White Charcoal: A piece of chalk might also do as a substitute.  I mentioned to the kids how the light areas on the drawing could be blended with the charcoal.  I also showed them how the paper towel works best for blending the charcoal in.


I hope this was helpful!  Contact me with any questions!

Thanks for reading,
Angelique Bowman


©2013 Angelique Buman Studio Lessons with Little Wonders: All work offered on this blog is offered as lessons written by Angelique Buman.  If you are interested in purchasing more thorough lessons on fine art for kids, please contact Angelique Buman.

Sunday, March 17, 2013

Pre-Sewing Necklace Activity for Ages 2 through 6


This is a great activity for children ages 2 through 6 to start learning how to poke a needle through material.  I offered a variety of needles including plastic training needles, mostly with dull tips to avoid any accidents.  The eyes of these needles were large enough to thread yarn through, which is what we used to thread the craft foam shapes with on the necklaces.  The kids were really proud of the final result, and I ended up offering this project a second time with different shapes and colors of the craft foam, since the kids were so interested in making more necklaces.  Read on to learn how to present this lesson to your kids.


Depending on the size of your group of kids, you may want to prepare part of the project before presenting it to them as it is a little time consuming.  First, I cut out lots of shapes out of craft foam sheets (at least 10 shapes for each student).  They were all different sizes-- small enough to be charms on a necklace, but large enough for the kids to work with.  If you need a visual, you may want to make your shapes say, a little larger than a quarter.  Perhaps even larger for the younger ones who are still working on building those fine motor skills.  Have markers handy for the kids to decorate the shapes with before threading them with a needle to make a necklace.  I had the needles threaded in advance, making sure that the thread was large enough to fit over a child's head.  I threaded the needle first and wrapped it around my own head, adding a couple inches in length to make sure there was extra room for cutting the needle off later.  

I suggest having old pillows handy when presenting this work to show the kids how they can press into the center of the shape and push down into the pillow with the needle to poke a hole.  The pillow was a safe and fun alternative to prevent kids pricking their little fingers.


When the kids have finished decorating their shapes and threading them with the needles onto the yarn, cut the needle off and knot it together for each child.  I chose to use yarn, because you can show the kids how they can spread their shapes out, so that the shapes are not all clumped together once the necklace has been cut and tied.

This is a great pre-sewing activity to help build coordination for poking holes with a needle and thread.  I hope this was helpful!

Thanks for seeing what we've been up to in the Little Wonders Studio.

~Angelique Bowman

Saturday, March 16, 2013

Teaching Kids About the Figure: Fine Art Lesson 1- The Head.

This Lesson was Taught to Ages 3 through 6


Teaching kids about the figure is definitely an ongoing project as there is so much to explore.  I wanted my students to recognize that there are countless ways to approach the figure, from realistic to abstract to expressive, etc.  After showing the children various types of figure drawings, paintings, and sculptures done by a number of artists, we began focusing in on the head.  I showed them portrait paintings by people like Vango and Picasso to get a look at some abstract and expressive approaches, and I pointed out how they don't necessarily always use skin tone colors.  We covered symbolism a little bit and that there could be intentions behind intense colors used in many of the faces we saw.  We got into the whole discussion about how different colors can express a certain mood, and that perhaps some of the "blue faces" we were seeing meant that the artist was trying to convey a message of sadness and that the red ones by some artists seemed "hot" or "angry," and so forth.

After the lesson, the kids were given copies of faces that I had drawn up for them to explore different approaches to shading and coloring in a face.  I find that offering them drawings to color in gives them a chance to pay more attention to the face structure, before giving a lesson on drawing the face, but there is no right or wrong here.  Anyway, many of my students preferred the more abstract or expressive approach, where I drew obvious shapes to simplify the features on the head.  Some wanted to try something more "realistic" by adding shading with pencils and shading tools that we recently had a lesson on.  Nearly all of them loved the idea of coloring the faces in with intense colors to represent a mood.  This exercise ended up being a great outlet for the kids to express themselves.


There are countless lessons to be had on the figure, and we will certainly be coming back to this topic soon.  In the meantime, we are getting ready for an art show coming up at our school in April.  Stop by again in mid April, as we will definitely have photos up from the show.  


Please contact me personally for more information on the Little Wonders:
Angelique Bowman
Little Wonders Art Teacher

Friday, February 22, 2013

Lesson on Interior Design for Kids: Introduction to Floor Plans

Lesson taught to children ages 3 through 6

No child is ever too young to start designing and there is no reason they can't start thinking about the world of design surrounding them. And as we know, kids have great imaginations and can come up with the craziest and neatest ideas (that may seem a little far fetched and unrealistic, but hey, it could happen!). This is definitely one of those lessons that challenge kids to think out-of-the-box.


About the Lesson

I prepared a lesson first by gathering books, floor plans, and magazines on interior design & decorating. After talking to my students about these things, the children explored the books and magazines to get ideas, and we also discussed the symbolism used in floor plans.  Afterward, my students chose from a variety of floor plans that I had gathered to start thinking about how they would want to decorate the interiors of the buildings.  Many of them enjoyed moving around cut-outs of symbols for objects like tables, couches, bath tubs, etc., and then gluing them down in the desired areas.  Others also enjoyed just drawing their own symbols, creating outdoor gardens, backyards, and more.  We will definitely have to do an extension of this lesson since the kids had so much fun and creativity to put forth.  

For more information on lessons, comment or contact me directly.  Hope you enjoyed!

~Angelique

Sunday, February 17, 2013

Collage Art Project for Kids ages 2 through 6

This activity was done recently with my students ages 2 through 3, but this is a simple project that could definitely be applied to older kids.  I offered pre-cut strips of craft paper, which is very helpful especially for little fingers just learning to cut, since it is easy for them to cut entire pieces off of the strip with just one snip.  A tip to show them would be to make sure the narrow part of the strip is all the way back and between teh blades so that only one snip is necessary.  While it's good for their fine motor skills, they also enjoyed pasting the strips onto cardboard with glue sticks.  My students also used markers to decorate the cardboard that they were gluing the strips to, and when they were all finished, we painted over each collage with tacky glue to keep it all in tact.  Any craft glue should do.

Pre-cut strips of craft paper to give the little ones a head start


These collages can be found on the website in our collage gallery, sold as greetings card prints:   
Collage Art Prints

Hope you enjoyed!

Saturday, February 16, 2013

Fine Art Introduction to Perspective Drawing for Kids

I recently taught my students, ages 3 through 6, their first lesson on perspective.  We definitely didn't get into point perspective just yet as there are some basics we needed to cover first.  I started off the lesson by sharing a number of perspective paintings and drawings by various artists.  I pointed out similarities between each artwork to teach the kids learn new vocabulary such as foreground, background, and horizon line.  Once my students began to understand and recognize these terms,they were able to explore this idea on paper with crayons and watercolor paints. 


The kids each spent two sessions on this project and really seemed to have a lot of fun with it.  They also came up with some pretty clever titles that will be posted soon with their artwork on the website.  In the meantime, if you have any questions, please feel free to ask away!

~Angelique Bowman

An Artist's Perspective on Art Made by Children


My Thoughts on Student Art

At first glance, artwork at this age may look very abstract and random, but as a teacher who spends lots of time with ages 2 through 6, I see a lot of the thought and concentration put into their work.  It's wonderful to listen to what what my students have to say about what they see in their own art.  I often walk around while my students are at work and ask them to talk about what they are making, and they often describe things in such detail and passion.  Of course, they don't use the terminology that fine artists might, but their imagination is strong and playful.  I especially find this true while my students are working on their artwork just after a lesson, since they have these new ideas just introduced to them that are fresh in their heads and ready to be worked out onto paper (or whatever the material may be).

Lately, I have also been encouraging the kids to title their artwork and it truly adds to the quality of their art.  I find that my students are often much more literal and to the point than a lot of us experienced fine artists try to be sometimes, with our catchy, clever, and metaphoric titles.  For example, one child painted a beach with rainbows and called it "Rainbow Beach," while another child made up a story about drinking all of the water from their pool... He titled his work, "When I Drank All of The Water from the Pool."  It was perfect, and needless to say, it made me smile and giggle a little.

I look forward to hanging out with my Little Wonders students as they are always full of surprises-- You just never know what level of creativity they will come up with next.  

The next time you see child art that might look like a bunch of scribbles or something abstract, just imagine what kind of detail and depth a child might see in it.


My students painting with watercolours

Sunday, February 3, 2013

Experimental Art Lesson on Wood Panels

My students, ages 2 through 6, just recently finished up an experimental painting that took each of them about two to three half-hour sessions.  The experiment involved changing the texture of smooth treated wood panels and then seeing how acrylic paint would take to it.  

I began the lesson by teaching the kids about carving, etching, and engraving into the wood.  I showed them my carving tools and demonstrated how to use them.  However, carving tools would be too dangerous to let the kids use them without the coordination, practice, and strength to use such tools.  I offered them jewelry files instead for the kids to "carve" or "engrave" into a wood panel, but it probably felt more like scratching into the panels for them.  I showed the kids how we can change the texture of a smooth surface into a rough surface by using the files.  If you are considering doing this project with your little ones, I suggest choosing softer woods that can be easily scratched into.  


Here is an image of the first session of carving (or scratching) on wood panels.  Some of the kids chose to have taped boarders so that when they were completely finished with all lessons, the untouched wood would frame the painting.


During the second session, I gave the kids a lesson on how to work with a painter's pallet using acrylic paint, and how to blend colors with plastic pallet knifes (which can be purchased at most arts and craft stores).  I used lids from plastic containers from butter spreads and yogurt containers to offer small splotches of acrylic paint on so that each child would have a small pallet to work with.  My students could either apply the paint to their wood panels with a pallet knife or a paint brush.  Each student also had a rag that they could rub the paint into the scratched surface with to see how the paint responded to the new surface.  The children found that it was easy to wipe the paint off of the smooth areas of the wood but that the paint would "stick" to or stain the scratches.

Here you can see how we used the lids to create our pallet.


Each painting turned out very unique and original.  After the kids felt that their paintings were finished, we displayed them for the week on a bulletin board, below.


  To view the paintings closely, you can check out our gallery here:
Each painting is offered in prints in the form of blank Greetings Cards.

Thanks for stopping by!
~Angelique Bowman

Monday, January 21, 2013

Fine Art Lessons on Pastels, Ages 2 through 6 and Up


Recently at the Little Wonders of Wonderland Studio, both the toddler class and the ages 3-6 group have had lessons on pastels.  They learned after a lesson that typically pastels have a higher quality and amount of pigment than their typical sidewalk chalk, which make the colors much more vibrant.  After watching some demonstrations and learning about blending, the kids especially enjoyed using a paper towel to wipe or blend colors to add a softer texture. We will be selling prints of their finished art on the website after they have had a couple more sessions.

Fold a paper towel and use a corner to blend sections of your pastel drawing

Usually we have a demonstration during a brief circle time, and then the kids go and find a seat at a table where the material is already set out for them.
~Angelique Bowman

Sunday, January 20, 2013

Group Painting on an Old Window Pane

Acrylic Painting on Glass by the Little Wonders of Wonderland, Ages 2 through 6 
The window pain was purchased at the Scrap Exchange, a creative reuse center in Durham, NC.  To learn more, visit the Scrap Exchange Website

Recently, my students, a.k.a. the Little Wonders, enjoyed a group project where they took turns painting with acrylic paint on a window pane. Small groups of kids, about 6 to 8 at a time, sat around the window pane which was laid down on the floor with small globs of paint scattered on the glass.  The kids were each given damp brushes and encouraged to take their brushes to the paint that was placed closest in their reach.  In between sessions with each group of kids, we let the paint dry for a day before working back into it so that it wouldn't get muddy.  Also be cautious that if the acrylic paint is not completely dry, it can peel off of the glass when a brush is working new paint into it.  Just to be safe, I encouraged the kids to only paint areas that have not yet been painted.  We considered it finished once all of the glass was covered up. 


Until we decide where to hang it, we have the glass on display at the school in front of a big window.  It looks really pretty on sunny days as the colors brighten up like a large sun catcher.